

Measuring Classroom Objects Using Rulers and Meter Sticks
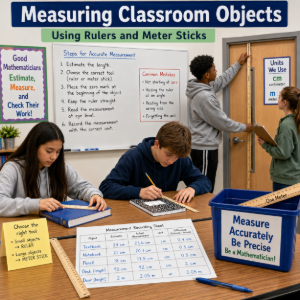
Grade Level: 6–8
Subject: Mathematics (Measurement)
Duration: 50–60 minutes
Aligned to: Common Core State Standards for Mathematics (Measurement and Data; Mathematical Practice Standards MP5: Use appropriate tools strategically and MP6: Attend to precision)
Learning Objective
Students will:
-
Measure classroom objects accurately using rulers and meter sticks.
-
Select the appropriate measuring tool for different objects.
-
Record measurements using the correct units.
-
Compare measurements and analyze the accuracy of their results.
Materials
-
Metric rulers
-
Meter sticks
-
Student recording sheet
-
Pencils
-
Clipboards (optional)
-
Calculator (optional)
-
Variety of classroom objects
Examples:
-
Textbook
-
Pencil
-
Desk
-
Chair
-
Whiteboard
-
Door
-
Window
-
Notebook
-
Trash can
Vocabulary
-
Length
-
Centimeter (cm)
-
Meter (m)
-
Estimate
-
Measure
-
Precision
-
Accuracy
Lesson Procedure
Step 1: Warm-Up (5–7 minutes)
Display three classroom objects.
Examples:
-
Pencil
-
Student desk
-
Whiteboard
Ask students:
-
Which object is closest to one meter long?
-
Which object would you measure using a ruler?
-
Which would require a meter stick?
Have students estimate the length of each object before discussing their answers.
Explain that good mathematicians estimate before measuring.
Step 2: Introduce the Learning Target (2 minutes)
Tell students:
"Today we will learn how to accurately measure classroom objects using rulers and meter sticks. We will also practice recording measurements clearly and checking our accuracy."
Review the lesson objectives.
Step 3: Teacher Demonstration (10 minutes)
Model proper measuring techniques.
Using a ruler:
-
Place the zero mark at the beginning of the object.
-
Keep the ruler straight.
-
Read the measurement at eye level.
-
Record the measurement in centimeters.
Using a meter stick:
Measure a classroom table or door.
Discuss:
-
Why is a meter stick the better tool?
-
Why wouldn't a small ruler be efficient?
Step 4: Discuss Common Measurement Errors (5 minutes)
Show examples of incorrect measuring.
Examples:
-
Starting at the edge instead of zero
-
Holding the ruler at an angle
-
Reading the wrong side of the ruler
-
Forgetting the unit
Ask students to identify each mistake.
Discuss how each error affects accuracy.
Step 5: Guided Practice (10 minutes)
Measure one object together as a class.
Example:
A textbook
Students should:
-
Estimate its length.
-
Measure it.
-
Record the measurement.
-
Compare estimates with actual measurements.
Repeat with one larger object using a meter stick.
Step 6: Partner Activity (15 minutes)
Students work in pairs.
Each pair measures eight classroom objects.
For every object they record:
-
Object name
-
Estimated length
-
Actual measurement
-
Unit used
-
Difference between estimate and actual measurement
Encourage partners to check each other's work.
Teacher circulates and provides feedback.
Step 7: Class Discussion (5 minutes)
Ask:
-
Which object surprised you?
-
Which measuring tool worked best?
-
Why is accuracy important?
-
Which measurement was the most difficult?
Discuss why different groups may have slightly different measurements.
Step 8: Independent Practice (5–10 minutes)
Students independently measure three additional classroom objects.
They should:
-
Choose the correct measuring tool.
-
Record measurements.
-
Explain why they selected that tool.
Step 9: Closure (5 minutes)
Review the lesson by asking:
-
What is the first step before measuring?
-
Why should you start at zero?
-
When should you use a meter stick instead of a ruler?
-
Why is precision important?
Emphasize that careful measurement is an important skill in mathematics, science, engineering, construction, and many everyday situations.
Exit Ticket
-
Which tool would you use to measure a classroom door?
-
Why should measurements begin at the zero mark?
-
Measure your math notebook and record the length in centimeters.
-
Explain one way to improve measurement accuracy.
Assessment
Students will be assessed through:
-
Participation during guided practice
-
Accuracy of recorded measurements
-
Proper use of measuring tools
-
Completed recording sheet
-
Exit ticket responses
Differentiation
Support
-
Pair students with supportive classmates.
-
Provide a measurement checklist.
-
Offer objects with clearly defined edges.
-
Demonstrate each step multiple times.
Extension
Students can:
-
Convert measurements from centimeters to meters.
-
Find the perimeter of desks, books, or tables.
-
Calculate the average length of several objects.
-
Create a scale drawing of one classroom object using their measurements.
-
Compare measurements taken by different groups and discuss any differences.
Real-World Connections
Students discuss careers that depend on accurate measurement, including:
-
Architects
-
Engineers
-
Surveyors
-
Carpenters
-
Interior designers
-
Scientists
-
Manufacturing technicians
Conclude by reinforcing that precise measurement is a foundational skill used in mathematics and many real-world professions, helping students solve problems accurately and communicate results effectively.
-
--------------
Posted 7/6/26
Education World®
EW Lesson Plans

EW Professional Development

Chatter
Trending
 You've reached the end of another grading period, and what could be more daunting than the task of composing insightful, original, and unique comments about every child in your class? The following positive statements will help you tailor your comments to specific children and highlight their strengths.
You can also use our statements to indicate a need for improvement. Turn the words around a bit, and you will transform each into a goal for a child to work toward. Sam cooperates consistently with others becomes Sam needs to cooperate more consistently with others, and Sally uses vivid language in writing may instead read With practice, Sally will learn to use vivid language in her writing. Make Jan seeks new challenges into a request for parental support by changing it to read Please encourage Jan to seek new challenges.
Whether you are tweaking statements from this page or creating original ones, check out our Report Card Thesaurus [see bottom of the page] that contains a list of appropriate adjectives and adverbs. There you will find the right words to keep your comments fresh and accurate.
We have organized our 125 report card comments by category. Read the entire list or click one of the category links below to jump to that list.
AttitudeBehaviorCharacterCommunication SkillsGroup WorkInterests and TalentsParticipationSocial SkillsTime ManagementWork Habits
Attitude
The student:
is an enthusiastic learner who seems to enjoy school.
exhibits a positive outlook and attitude in the classroom.
appears well rested and ready for each day's activities.
shows enthusiasm for classroom activities.
shows initiative and looks for new ways to get involved.
uses instincts to deal with matters independently and in a positive way.
strives to reach their full potential.
is committed to doing their best.
seeks new challenges.
takes responsibility for their learning.
Behavior
The student:
cooperates consistently with the teacher and other students.
transitions easily between classroom activities without distraction.
is courteous and shows good manners in the classroom.
follows classroom rules.
conducts themselves with maturity.
responds appropriately when corrected.
remains focused on the activity at hand.
resists the urge to be distracted by other students.
is kind and helpful to everyone in the classroom.
sets an example of excellence in behavior and cooperation.
Character
The student:
shows respect for teachers and peers.
treats school property and the belongings of others with care and respect.
is honest and trustworthy in dealings with others.
displays good citizenship by assisting other students.
joins in school community projects.
is concerned about the feelings of peers.
faithfully performs classroom tasks.
can be depended on to do what they are asked to do.
seeks responsibilities and follows through.
is thoughtful in interactions with others.
is kind, respectful and helpful when interacting with his/her peers
is respectful of other students in our classroom and the school community
demonstrates responsibility daily by caring for the materials in our classroom carefully and thoughtfully
takes his/her classroom jobs seriously and demonstrates responsibility when completing them
is always honest and can be counted on to recount information when asked
is considerate when interacting with his/her teachers
demonstrates his/her manners on a daily basis and is always respectful
has incredible self-discipline and always gets his/her work done in a timely manner
can be counted on to be one of the first students to begin working on the task that is given
perseveres when faced with difficulty by asking questions and trying his/her best
does not give up when facing a task that is difficult and always does his/her best
is such a caring boy/girl and demonstrates concern for his/her peers
demonstrates his/her caring nature when helping his/her peers when they need the assistance
is a model citizen in our classroom
is demonstrates his/her citizenship in our classroom by helping to keep it clean and taking care of the materials in it
can always be counted on to cooperate with his/her peers
is able to cooperate and work well with any of the other students in the class
is exceptionally organized and takes care of his/her things
is always enthusiastic when completing his/her work
is agreeable and polite when working with others
is thoughtful and kind in his/her interactions with others
is creative when problem solving
is very hardworking and always completes all of his/her work
is patient and kind when working with his/her peers who need extra assistance
trustworthy and can always be counted on to step in and help where needed
Communication Skills
The student:
has a well-developed vocabulary.
chooses words with care.
expresses ideas clearly, both verbally and through writing.
has a vibrant imagination and excels in creative writing.
has found their voice through poetry writing.
uses vivid language in writing.
writes clearly and with purpose.
writes with depth and insight.
can make a logical and persuasive argument.
listens to the comments and ideas of others without interrupting.
Group Work
The student:
offers constructive suggestions to peers to enhance their work.
accepts the recommendations of peers and acts on them when appropriate.
is sensitive to the thoughts and opinions of others in the group.
takes on various roles in the work group as needed or assigned.
welcomes leadership roles in groups.
shows fairness in distributing group tasks.
plans and carries out group activities carefully.
works democratically with peers.
encourages other members of the group.
helps to keep the work group focused and on task.
Interests and Talents
The student:
has a well-developed sense of humor.
holds many varied interests.
has a keen interest that has been shared with the class.
displays and talks about personal items from home when they relate to topics of study.
provides background knowledge about topics of particular interest to them.
has an impressive understanding and depth of knowledge about their interests.
seeks additional information independently about classroom topics that pique interest.
reads extensively for enjoyment.
frequently discusses concepts about which they have read.
is a gifted performer.
is a talented artist.
has a flair for dramatic reading and acting.
enjoys sharing their musical talent with the class.
Participation
The student:
listens attentively to the responses of others.
follows directions.
takes an active role in discussions.
enhances group discussion through insightful comments.
shares personal experiences and opinions with peers.
responds to what has been read or discussed in class and as homework.
asks for clarification when needed.
regularly volunteers to assist in classroom activities.
remains an active learner throughout the school day.
Social Skills
The student:
makes friends quickly in the classroom.
is well-liked by classmates.
handles disagreements with peers appropriately.
treats other students with fairness and understanding.
is a valued member of the class.
has compassion for peers and others.
seems comfortable in new situations.
enjoys conversation with friends during free periods.
chooses to spend free time with friends.
Time Management
The student:
tackles classroom assignments, tasks, and group work in an organized manner.
uses class time wisely.
arrives on time for school (and/or class) every day.
is well-prepared for class each day.
works at an appropriate pace, neither too quickly or slowly.
completes assignments in the time allotted.
paces work on long-term assignments.
sets achievable goals with respect to time.
completes make-up work in a timely fashion.
Work Habits
The student:
is a conscientious, hard-working student.
works independently.
is a self-motivated student.
consistently completes homework assignments.
puts forth their best effort into homework assignments.
exceeds expectations with the quality of their work.
readily grasps new concepts and ideas.
generates neat and careful work.
checks work thoroughly before submitting it.
stays on task with little supervision.
displays self-discipline.
avoids careless errors through attention to detail.
uses free minutes of class time constructively.
creates impressive home projects.
Related: Needs Improvement Report Card Comments for even more comments!
Student Certificates!
Recognize positive attitudes and achievements with personalized student award certificates!
Report Card Thesaurus
Looking for some great adverbs and adjectives to bring to life the comments that you put on report cards? Go beyond the stale and repetitive With this list, your notes will always be creative and unique.
Adjectives
attentive, capable, careful, cheerful, confident, cooperative, courteous, creative, dynamic, eager, energetic, generous, hard-working, helpful, honest, imaginative, independent, industrious, motivated, organized, outgoing, pleasant, polite, resourceful, sincere, unique
Adverbs
always, commonly, consistently, daily, frequently, monthly, never, occasionally, often, rarely, regularly, typically, usually, weekly
Copyright© 2026 Education World
You've reached the end of another grading period, and what could be more daunting than the task of composing insightful, original, and unique comments about every child in your class? The following positive statements will help you tailor your comments to specific children and highlight their strengths.
You can also use our statements to indicate a need for improvement. Turn the words around a bit, and you will transform each into a goal for a child to work toward. Sam cooperates consistently with others becomes Sam needs to cooperate more consistently with others, and Sally uses vivid language in writing may instead read With practice, Sally will learn to use vivid language in her writing. Make Jan seeks new challenges into a request for parental support by changing it to read Please encourage Jan to seek new challenges.
Whether you are tweaking statements from this page or creating original ones, check out our Report Card Thesaurus [see bottom of the page] that contains a list of appropriate adjectives and adverbs. There you will find the right words to keep your comments fresh and accurate.
We have organized our 125 report card comments by category. Read the entire list or click one of the category links below to jump to that list.
AttitudeBehaviorCharacterCommunication SkillsGroup WorkInterests and TalentsParticipationSocial SkillsTime ManagementWork Habits
Attitude
The student:
is an enthusiastic learner who seems to enjoy school.
exhibits a positive outlook and attitude in the classroom.
appears well rested and ready for each day's activities.
shows enthusiasm for classroom activities.
shows initiative and looks for new ways to get involved.
uses instincts to deal with matters independently and in a positive way.
strives to reach their full potential.
is committed to doing their best.
seeks new challenges.
takes responsibility for their learning.
Behavior
The student:
cooperates consistently with the teacher and other students.
transitions easily between classroom activities without distraction.
is courteous and shows good manners in the classroom.
follows classroom rules.
conducts themselves with maturity.
responds appropriately when corrected.
remains focused on the activity at hand.
resists the urge to be distracted by other students.
is kind and helpful to everyone in the classroom.
sets an example of excellence in behavior and cooperation.
Character
The student:
shows respect for teachers and peers.
treats school property and the belongings of others with care and respect.
is honest and trustworthy in dealings with others.
displays good citizenship by assisting other students.
joins in school community projects.
is concerned about the feelings of peers.
faithfully performs classroom tasks.
can be depended on to do what they are asked to do.
seeks responsibilities and follows through.
is thoughtful in interactions with others.
is kind, respectful and helpful when interacting with his/her peers
is respectful of other students in our classroom and the school community
demonstrates responsibility daily by caring for the materials in our classroom carefully and thoughtfully
takes his/her classroom jobs seriously and demonstrates responsibility when completing them
is always honest and can be counted on to recount information when asked
is considerate when interacting with his/her teachers
demonstrates his/her manners on a daily basis and is always respectful
has incredible self-discipline and always gets his/her work done in a timely manner
can be counted on to be one of the first students to begin working on the task that is given
perseveres when faced with difficulty by asking questions and trying his/her best
does not give up when facing a task that is difficult and always does his/her best
is such a caring boy/girl and demonstrates concern for his/her peers
demonstrates his/her caring nature when helping his/her peers when they need the assistance
is a model citizen in our classroom
is demonstrates his/her citizenship in our classroom by helping to keep it clean and taking care of the materials in it
can always be counted on to cooperate with his/her peers
is able to cooperate and work well with any of the other students in the class
is exceptionally organized and takes care of his/her things
is always enthusiastic when completing his/her work
is agreeable and polite when working with others
is thoughtful and kind in his/her interactions with others
is creative when problem solving
is very hardworking and always completes all of his/her work
is patient and kind when working with his/her peers who need extra assistance
trustworthy and can always be counted on to step in and help where needed
Communication Skills
The student:
has a well-developed vocabulary.
chooses words with care.
expresses ideas clearly, both verbally and through writing.
has a vibrant imagination and excels in creative writing.
has found their voice through poetry writing.
uses vivid language in writing.
writes clearly and with purpose.
writes with depth and insight.
can make a logical and persuasive argument.
listens to the comments and ideas of others without interrupting.
Group Work
The student:
offers constructive suggestions to peers to enhance their work.
accepts the recommendations of peers and acts on them when appropriate.
is sensitive to the thoughts and opinions of others in the group.
takes on various roles in the work group as needed or assigned.
welcomes leadership roles in groups.
shows fairness in distributing group tasks.
plans and carries out group activities carefully.
works democratically with peers.
encourages other members of the group.
helps to keep the work group focused and on task.
Interests and Talents
The student:
has a well-developed sense of humor.
holds many varied interests.
has a keen interest that has been shared with the class.
displays and talks about personal items from home when they relate to topics of study.
provides background knowledge about topics of particular interest to them.
has an impressive understanding and depth of knowledge about their interests.
seeks additional information independently about classroom topics that pique interest.
reads extensively for enjoyment.
frequently discusses concepts about which they have read.
is a gifted performer.
is a talented artist.
has a flair for dramatic reading and acting.
enjoys sharing their musical talent with the class.
Participation
The student:
listens attentively to the responses of others.
follows directions.
takes an active role in discussions.
enhances group discussion through insightful comments.
shares personal experiences and opinions with peers.
responds to what has been read or discussed in class and as homework.
asks for clarification when needed.
regularly volunteers to assist in classroom activities.
remains an active learner throughout the school day.
Social Skills
The student:
makes friends quickly in the classroom.
is well-liked by classmates.
handles disagreements with peers appropriately.
treats other students with fairness and understanding.
is a valued member of the class.
has compassion for peers and others.
seems comfortable in new situations.
enjoys conversation with friends during free periods.
chooses to spend free time with friends.
Time Management
The student:
tackles classroom assignments, tasks, and group work in an organized manner.
uses class time wisely.
arrives on time for school (and/or class) every day.
is well-prepared for class each day.
works at an appropriate pace, neither too quickly or slowly.
completes assignments in the time allotted.
paces work on long-term assignments.
sets achievable goals with respect to time.
completes make-up work in a timely fashion.
Work Habits
The student:
is a conscientious, hard-working student.
works independently.
is a self-motivated student.
consistently completes homework assignments.
puts forth their best effort into homework assignments.
exceeds expectations with the quality of their work.
readily grasps new concepts and ideas.
generates neat and careful work.
checks work thoroughly before submitting it.
stays on task with little supervision.
displays self-discipline.
avoids careless errors through attention to detail.
uses free minutes of class time constructively.
creates impressive home projects.
Related: Needs Improvement Report Card Comments for even more comments!
Student Certificates!
Recognize positive attitudes and achievements with personalized student award certificates!
Report Card Thesaurus
Looking for some great adverbs and adjectives to bring to life the comments that you put on report cards? Go beyond the stale and repetitive With this list, your notes will always be creative and unique.
Adjectives
attentive, capable, careful, cheerful, confident, cooperative, courteous, creative, dynamic, eager, energetic, generous, hard-working, helpful, honest, imaginative, independent, industrious, motivated, organized, outgoing, pleasant, polite, resourceful, sincere, unique
Adverbs
always, commonly, consistently, daily, frequently, monthly, never, occasionally, often, rarely, regularly, typically, usually, weekly
Copyright© 2026 Education World Back to Geography Lesson Plan
Where Did Foods Originate?
(Foods of the New World and Old World)
Subjects
Arts & Humanities
--Language Arts
Educational Technology
Science
--Agriculture
Social Studies
--Economics
--Geography
--History
----U.S. History
----World History
--Regions/Cultures
Grade
K-2
3-5
6-8
9-12
Advanced
Brief Description
Students explore how New World explorers helped change the Old World's diet (and vice versa).
Objectives
Students will
learn about changes that occurred in the New World and Old World as a result of early exploration.
use library and Internet sources to research food origins. (Older students only.)
create a bulletin-board map illustrating the many foods that were shared as a result of exploration.
Keywords
Columbus, explorers, origin, food, timeline, plants, map, New World, Old World, colonies, colonial, crops, media literacy, products, consumer
Materials Needed:
library and/or Internet access (older students only)
outline map of the world (You might print the map on a transparency; then use an overhead projector to project and trace a large outline map of the world onto white paper on a bulletin board.)
magazines (optional)
Lesson Plan
The early explorers to the Americas were exposed to many things they had never seen before. Besides strange people and animals, they were exposed to many foods that were unknown in the Old World. In this lesson, you might post an outline map of the continents on a bulletin board. Have students use library and/or Internet resources (provided below) to research some of the edible items the first explorers saw for the first time in the New World. On the bulletin board, draw an arrow from the New World (the Americas) to the Old World (Europe, Asia, Africa) and post around it drawings or images (from magazines or clip art) of products discovered in the New World and taken back to the Old World.
Soon, the explorers would introduce plants/foods from the Old World to the Americas. You might draw a second arrow on the board -- from the Old World to the New World -- and post appropriate drawings or images around it.
Adapt the Lesson for Younger Students
Younger students will not have the ability to research foods that originated in the New and Old World. You might adapt the lesson by sharing some of the food items in the Food Lists section below. Have students collect or draw pictures of those items for the bulletin board display.
Resources
In addition to library resources, students might use the following Internet sites as they research the geographic origins of some foods:
Curry, Spice, and All Things Nice: Food Origins
The Food Timeline
Native Foods of the Americas
A Harvest Gathered: Food in the New World
We Are What We Eat Timeline (Note: This resource is an archived resource; the original page is no longer live and updated.)
Food Lists Our research uncovered the Old and New World foods below. Students might find many of those and add them to the bulletin board display. Notice that some items appear on both lists -- beans, for example. There are many varieties of beans, some with New World origins and others with their origins in the Old World. In our research, we found sources that indicate onions originated in the New and sources that indicate onions originated in the Old World. Students might create a special question mark symbol to post next to any item for which contradictory sources can be found
Note: The Food Timeline is a resource that documents many Old World products. This resource sets up a number of contradictions. For example:
Many sources note that tomatoes originated in the New World; The Food Timeline indicates that tomatoes were introduced to the New World in 1781.
The Food Timeline indicates that strawberries and raspberries were available in the 1st century in Europe; other sources identify them as New World commodities.
Foods That Originated in the New World: artichokes, avocados, beans (kidney and lima), black walnuts, blueberries, cacao (cocoa/chocolate), cashews, cassava, chestnuts, corn (maize), crab apples, cranberries, gourds, hickory nuts, onions, papayas, peanuts, pecans, peppers (bell peppers, chili peppers), pineapples, plums, potatoes, pumpkins, raspberries, squash, strawberries, sunflowers, sweet potatoes, tobacco, tomatoes, turkey, vanilla, wild cherries, wild rice.
Foods That Originated in the Old World: apples, bananas, beans (some varieties), beets, broccoli, carrots, cattle (beef), cauliflower, celery, cheese, cherries, chickens, chickpeas, cinnamon, coffee, cows, cucumbers, eggplant, garlic, ginger, grapes, honey (honey bees), lemons, lettuce, limes, mangos, oats, okra, olives, onions, oranges, pasta, peaches, pears, peas, pigs, radishes, rice, sheep, spinach, tea, watermelon, wheat, yams.
Extension Activities
Home-school connection. Have students and their parents search their food cupboards at home; ask each student to bring in two food items whose origin can be traced to a specific place (foreign if possible, domestic if not). Labels from those products will be sufficient, especially if the products are in breakable containers. Place those labels/items around a world map; use yarn to connect each label to the location of its origin on the map.
Media literacy. Because students will research many sources, have them list the sources for the information they find about each food item. Have them place an asterisk or checkmark next to the food item each time they find that item in a different source. If students find a food in multiple sources, they might consider it "verified"; those foods they find in only one source might require additional research to verify.
Assessment
Invite students to agree or disagree with the following statement:The early explorers were surprised by many of the foods they saw in the New World.
Have students write a paragraph in support of their opinion.
Lesson Plan Source
Education World
Submitted By
Gary Hopkins
National Standards
LANGUAGE ARTS: EnglishGRADES K - 12NL-ENG.K-12.2 Reading for UnderstandingNL-ENG.K-12.8 Developing Research SkillsNL-ENG.K-12.9 Multicultural UnderstandingNL-ENG.K-12.12 Applying Language Skills
SOCIAL SCIENCES: EconomicsGRADES K - 4NSS-EC.K-4.1 Productive ResourcesNSS-EC.K-4.6 Gain from TradeGRADES 5 - 8NSS-EC.5-8.1 Productive ResourcesNSS-EC.5-8.6 Gain from TradeGRADES 9 - 12NSS-EC.9-12.1 Productive ResourcesNSS-EC.9-12.6 Gain from Trade
SOCIAL SCIENCES: GeographyGRADES K - 12NSS-G.K-12.1 The World in Spatial TermsNSS-G.K-12.2 Places and Regions
SOCIAL SCIENCES: U.S. HistoryGRADES K - 4NSS-USH.K-4.1 Living and Working together in Families and Communities, Now and Long AgoNSS-USH.K-4.3 The History of the United States: Democratic Principles and Values and the People from Many Cultures Who Contributed to Its Cultural, Economic, and Political HeritageNSS-USH.K-4.4 The History of Peoples of Many Cultures Around the WorldGRADES 5 - 12NSS-USH.5-12.1 Era 1: Three Worlds Meet (Beginnings to 1620)NSS-USH.5-12.2 Era 2: Colonization and Settlement (1585-1763)NSS-WH.5-12.6 Global Expansion and Encounter, 1450-1770
TECHNOLOGYGRADES K - 12NT.K-12.1 Basic Operations and ConceptsNT.K-12.5 Technology Research Tools
Find many more great geography lesson ideas and resources in Education World's Geography Center.
Click here to return to this week's World of Learning lesson plan page.
Updated 10/11/12
Back to Geography Lesson Plan
Where Did Foods Originate?
(Foods of the New World and Old World)
Subjects
Arts & Humanities
--Language Arts
Educational Technology
Science
--Agriculture
Social Studies
--Economics
--Geography
--History
----U.S. History
----World History
--Regions/Cultures
Grade
K-2
3-5
6-8
9-12
Advanced
Brief Description
Students explore how New World explorers helped change the Old World's diet (and vice versa).
Objectives
Students will
learn about changes that occurred in the New World and Old World as a result of early exploration.
use library and Internet sources to research food origins. (Older students only.)
create a bulletin-board map illustrating the many foods that were shared as a result of exploration.
Keywords
Columbus, explorers, origin, food, timeline, plants, map, New World, Old World, colonies, colonial, crops, media literacy, products, consumer
Materials Needed:
library and/or Internet access (older students only)
outline map of the world (You might print the map on a transparency; then use an overhead projector to project and trace a large outline map of the world onto white paper on a bulletin board.)
magazines (optional)
Lesson Plan
The early explorers to the Americas were exposed to many things they had never seen before. Besides strange people and animals, they were exposed to many foods that were unknown in the Old World. In this lesson, you might post an outline map of the continents on a bulletin board. Have students use library and/or Internet resources (provided below) to research some of the edible items the first explorers saw for the first time in the New World. On the bulletin board, draw an arrow from the New World (the Americas) to the Old World (Europe, Asia, Africa) and post around it drawings or images (from magazines or clip art) of products discovered in the New World and taken back to the Old World.
Soon, the explorers would introduce plants/foods from the Old World to the Americas. You might draw a second arrow on the board -- from the Old World to the New World -- and post appropriate drawings or images around it.
Adapt the Lesson for Younger Students
Younger students will not have the ability to research foods that originated in the New and Old World. You might adapt the lesson by sharing some of the food items in the Food Lists section below. Have students collect or draw pictures of those items for the bulletin board display.
Resources
In addition to library resources, students might use the following Internet sites as they research the geographic origins of some foods:
Curry, Spice, and All Things Nice: Food Origins
The Food Timeline
Native Foods of the Americas
A Harvest Gathered: Food in the New World
We Are What We Eat Timeline (Note: This resource is an archived resource; the original page is no longer live and updated.)
Food Lists Our research uncovered the Old and New World foods below. Students might find many of those and add them to the bulletin board display. Notice that some items appear on both lists -- beans, for example. There are many varieties of beans, some with New World origins and others with their origins in the Old World. In our research, we found sources that indicate onions originated in the New and sources that indicate onions originated in the Old World. Students might create a special question mark symbol to post next to any item for which contradictory sources can be found
Note: The Food Timeline is a resource that documents many Old World products. This resource sets up a number of contradictions. For example:
Many sources note that tomatoes originated in the New World; The Food Timeline indicates that tomatoes were introduced to the New World in 1781.
The Food Timeline indicates that strawberries and raspberries were available in the 1st century in Europe; other sources identify them as New World commodities.
Foods That Originated in the New World: artichokes, avocados, beans (kidney and lima), black walnuts, blueberries, cacao (cocoa/chocolate), cashews, cassava, chestnuts, corn (maize), crab apples, cranberries, gourds, hickory nuts, onions, papayas, peanuts, pecans, peppers (bell peppers, chili peppers), pineapples, plums, potatoes, pumpkins, raspberries, squash, strawberries, sunflowers, sweet potatoes, tobacco, tomatoes, turkey, vanilla, wild cherries, wild rice.
Foods That Originated in the Old World: apples, bananas, beans (some varieties), beets, broccoli, carrots, cattle (beef), cauliflower, celery, cheese, cherries, chickens, chickpeas, cinnamon, coffee, cows, cucumbers, eggplant, garlic, ginger, grapes, honey (honey bees), lemons, lettuce, limes, mangos, oats, okra, olives, onions, oranges, pasta, peaches, pears, peas, pigs, radishes, rice, sheep, spinach, tea, watermelon, wheat, yams.
Extension Activities
Home-school connection. Have students and their parents search their food cupboards at home; ask each student to bring in two food items whose origin can be traced to a specific place (foreign if possible, domestic if not). Labels from those products will be sufficient, especially if the products are in breakable containers. Place those labels/items around a world map; use yarn to connect each label to the location of its origin on the map.
Media literacy. Because students will research many sources, have them list the sources for the information they find about each food item. Have them place an asterisk or checkmark next to the food item each time they find that item in a different source. If students find a food in multiple sources, they might consider it "verified"; those foods they find in only one source might require additional research to verify.
Assessment
Invite students to agree or disagree with the following statement:The early explorers were surprised by many of the foods they saw in the New World.
Have students write a paragraph in support of their opinion.
Lesson Plan Source
Education World
Submitted By
Gary Hopkins
National Standards
LANGUAGE ARTS: EnglishGRADES K - 12NL-ENG.K-12.2 Reading for UnderstandingNL-ENG.K-12.8 Developing Research SkillsNL-ENG.K-12.9 Multicultural UnderstandingNL-ENG.K-12.12 Applying Language Skills
SOCIAL SCIENCES: EconomicsGRADES K - 4NSS-EC.K-4.1 Productive ResourcesNSS-EC.K-4.6 Gain from TradeGRADES 5 - 8NSS-EC.5-8.1 Productive ResourcesNSS-EC.5-8.6 Gain from TradeGRADES 9 - 12NSS-EC.9-12.1 Productive ResourcesNSS-EC.9-12.6 Gain from Trade
SOCIAL SCIENCES: GeographyGRADES K - 12NSS-G.K-12.1 The World in Spatial TermsNSS-G.K-12.2 Places and Regions
SOCIAL SCIENCES: U.S. HistoryGRADES K - 4NSS-USH.K-4.1 Living and Working together in Families and Communities, Now and Long AgoNSS-USH.K-4.3 The History of the United States: Democratic Principles and Values and the People from Many Cultures Who Contributed to Its Cultural, Economic, and Political HeritageNSS-USH.K-4.4 The History of Peoples of Many Cultures Around the WorldGRADES 5 - 12NSS-USH.5-12.1 Era 1: Three Worlds Meet (Beginnings to 1620)NSS-USH.5-12.2 Era 2: Colonization and Settlement (1585-1763)NSS-WH.5-12.6 Global Expansion and Encounter, 1450-1770
TECHNOLOGYGRADES K - 12NT.K-12.1 Basic Operations and ConceptsNT.K-12.5 Technology Research Tools
Find many more great geography lesson ideas and resources in Education World's Geography Center.
Click here to return to this week's World of Learning lesson plan page.
Updated 10/11/12 Having a tough time finding the right words to come up with "areas for improvement" comments on your students' report cards? Check out our helpful suggestions to find just the right one!
The following statements will help you tailor your comments to specific children and highlight their areas for improvement.
Be sure to check out our 125 Report Card Comments for positive comments!
Needs Improvement- all topics
is a hard worker, but has difficulty staying on task.
has a difficult time staying on task and completing his/her work.
needs to be more respectful and courteous to his/her classmates.
needs to listen to directions fully so that he/she can learn to work more independently.
is not demonstrating responsibility and needs to be consistently reminded of how to perform daily classroom tasks.
works well alone, but needs to learn how to work better cooperatively with peers.
does not have a positive attitude about school and the work that needs to be completed.
struggles with completing his/her work in a timely manner.
gives up easily when something is difficult and needs extensive encouragement to attempt the task.
gets along with his/her classmates well, but is very disruptive during full group instruction.
has a difficult time using the materials in the classroom in a respectful and appropriate manner.
has a difficult time concentrating and gets distracted easily.
is having a difficult time with math. Going over _____ at home would help considerably.
is having a very difficult time understanding math concepts for his/her grade level. He/she would benefit from extra assistance.
could benefit from spending time reading with an adult every day.
is enthusiastic, but is not understanding ____. Additional work on these topics would be incredibly helpful.
is having difficulty concentrating during math lessons and is not learning the material that is being taught because of that.
understands math concepts when using manipulatives, but is having a difficult time learning to ____ without them.
is a very enthusiastic reader. He/she needs to continue to work on _____ to make him/her a better reader.
needs to practice reading at home every day to help make him/her a stronger reader.
needs to practice his/her sight words so that he/she knows them on sight and can spell them.
needs to work on his/her spelling. Practicing at home would be very beneficial.
can read words fluently, but has a difficult time with comprehension. Reading with ______ every day would be helpful.
could benefit from working on his/her handwriting. Slowing down and taking more time would help with this.
is having difficulty writing stories. Encouraging him/her to tell stories at home would help with this.
has a difficult time knowing when it is appropriate to share his/her thoughts. We are working on learning when it is a good time to share and when it is a good time to listen.
needs to work on his/her time management skills. _______is able to complete his/her work, but spends too much time on other tasks and rarely completes his/her work.
needs reminders about the daily classroom routine. Talking through the classroom routine at home would be helpful.
is having a difficult time remembering the difference between short and long vowel sounds. Practicing these at home would be very helpful.
is struggling with reading. He/she does not seem to enjoy it and does not want to do it. Choosing books that he/she like and reading them with him/her at home will help build a love of reading.
frequently turns in incomplete homework or does not hand in any homework. Encouraging _______to complete his/her homework would be very helpful.
does not take pride in his/her work. We are working to help him/her feel good about what he/she accomplishes.
does not actively participate in small group activities. Active participation would be beneficial.
has a difficult time remembering to go back and check his/her work. Because of this, there are often spelling and grammar mistakes in his/her work.
does not much effort into his/her writing. As a result, his/her work is often messy and incomplete.
is struggling to understand new concepts in science. Paying closer attention to the class discussions and the readings that we are doing would be beneficial.
is reading significantly below grade level. Intervention is required.
does not write a clear beginning, middle and end when writing a story. We are working to identify the parts of the stories that he/she is writing.
is struggling to use new reading strategies to help him/her read higher level books.
is wonderful at writing creative stories, but needs to work on writing nonfiction and using facts.
has a difficult time understanding how to solve word problems.
needs to slow down and go back and check his/her work to make sure that all answers are correct.
is not completing math work that is on grade level. Intervention is required.
is struggling to understand place value.
is very enthusiastic about math, but struggles to understand basic concepts.
has a difficult time remembering the value of different coins and how to count them. Practicing this at home would be helpful.
would benefit from practicing math facts at home.
is very engaged during whole group math instruction, but struggles to work independently.
is able to correctly answer word problems, but is unable to explain how he/she got the answer.
is having a difficult time comparing numbers.
Related: 125 Report Card Comments for positive comments!
Student Award Certificates!
Recognize positive attitudes and achievements with personalized student award certificates!
Copyright© 2020 Education World
Having a tough time finding the right words to come up with "areas for improvement" comments on your students' report cards? Check out our helpful suggestions to find just the right one!
The following statements will help you tailor your comments to specific children and highlight their areas for improvement.
Be sure to check out our 125 Report Card Comments for positive comments!
Needs Improvement- all topics
is a hard worker, but has difficulty staying on task.
has a difficult time staying on task and completing his/her work.
needs to be more respectful and courteous to his/her classmates.
needs to listen to directions fully so that he/she can learn to work more independently.
is not demonstrating responsibility and needs to be consistently reminded of how to perform daily classroom tasks.
works well alone, but needs to learn how to work better cooperatively with peers.
does not have a positive attitude about school and the work that needs to be completed.
struggles with completing his/her work in a timely manner.
gives up easily when something is difficult and needs extensive encouragement to attempt the task.
gets along with his/her classmates well, but is very disruptive during full group instruction.
has a difficult time using the materials in the classroom in a respectful and appropriate manner.
has a difficult time concentrating and gets distracted easily.
is having a difficult time with math. Going over _____ at home would help considerably.
is having a very difficult time understanding math concepts for his/her grade level. He/she would benefit from extra assistance.
could benefit from spending time reading with an adult every day.
is enthusiastic, but is not understanding ____. Additional work on these topics would be incredibly helpful.
is having difficulty concentrating during math lessons and is not learning the material that is being taught because of that.
understands math concepts when using manipulatives, but is having a difficult time learning to ____ without them.
is a very enthusiastic reader. He/she needs to continue to work on _____ to make him/her a better reader.
needs to practice reading at home every day to help make him/her a stronger reader.
needs to practice his/her sight words so that he/she knows them on sight and can spell them.
needs to work on his/her spelling. Practicing at home would be very beneficial.
can read words fluently, but has a difficult time with comprehension. Reading with ______ every day would be helpful.
could benefit from working on his/her handwriting. Slowing down and taking more time would help with this.
is having difficulty writing stories. Encouraging him/her to tell stories at home would help with this.
has a difficult time knowing when it is appropriate to share his/her thoughts. We are working on learning when it is a good time to share and when it is a good time to listen.
needs to work on his/her time management skills. _______is able to complete his/her work, but spends too much time on other tasks and rarely completes his/her work.
needs reminders about the daily classroom routine. Talking through the classroom routine at home would be helpful.
is having a difficult time remembering the difference between short and long vowel sounds. Practicing these at home would be very helpful.
is struggling with reading. He/she does not seem to enjoy it and does not want to do it. Choosing books that he/she like and reading them with him/her at home will help build a love of reading.
frequently turns in incomplete homework or does not hand in any homework. Encouraging _______to complete his/her homework would be very helpful.
does not take pride in his/her work. We are working to help him/her feel good about what he/she accomplishes.
does not actively participate in small group activities. Active participation would be beneficial.
has a difficult time remembering to go back and check his/her work. Because of this, there are often spelling and grammar mistakes in his/her work.
does not much effort into his/her writing. As a result, his/her work is often messy and incomplete.
is struggling to understand new concepts in science. Paying closer attention to the class discussions and the readings that we are doing would be beneficial.
is reading significantly below grade level. Intervention is required.
does not write a clear beginning, middle and end when writing a story. We are working to identify the parts of the stories that he/she is writing.
is struggling to use new reading strategies to help him/her read higher level books.
is wonderful at writing creative stories, but needs to work on writing nonfiction and using facts.
has a difficult time understanding how to solve word problems.
needs to slow down and go back and check his/her work to make sure that all answers are correct.
is not completing math work that is on grade level. Intervention is required.
is struggling to understand place value.
is very enthusiastic about math, but struggles to understand basic concepts.
has a difficult time remembering the value of different coins and how to count them. Practicing this at home would be helpful.
would benefit from practicing math facts at home.
is very engaged during whole group math instruction, but struggles to work independently.
is able to correctly answer word problems, but is unable to explain how he/she got the answer.
is having a difficult time comparing numbers.
Related: 125 Report Card Comments for positive comments!
Student Award Certificates!
Recognize positive attitudes and achievements with personalized student award certificates!
Copyright© 2020 Education World
Receive timely lesson ideas and PD tips
Sitemap
|




Sign up for our free weekly newsletter and receive
top education news, lesson ideas, teaching tips and more!


COPYRIGHT 1996-2016 BY EDUCATION WORLD, INC. ALL RIGHTS RESERVED.
COPYRIGHT 1996 - 2026 BY EDUCATION WORLD, INC. ALL RIGHTS RESERVED.
75 Mill Street, Colchester, CT 06415
