|
DOTS RIGHT!
Time to add the dots!
- Decide whether you will use numbers or letters to label the dots, and how many dots you want to use. For
example, if you're using letters (A-Z), you'll want 26 dots. If using numbers, 20 is a good number to begin
with.
- Before drawing the dots, decide where they will go. You'll want them fairly even, so look at your image
-- in this case, the snowman -- and visualize half the dots on its right side and half on its left.
- Click View > Zoom and choose 125 percent. (You want to be close up for the dots!)
- Click View > Toolbars > Drawing.
- On the Drawing toolbar, click Basic Shapes, and select the Oval tool. (It looks like a circle.)
- Click and drag a small circle to anywhere on the page. Adjust the circle to an appropriate size.
- Click the circle you've created. On the Drawing toolbar, click the down arrow next to the paint can, and
then click black to fill in your circle.
- Click the circle once to select it, and then press CTRL-D (or Apple-D on a Mac) to make a duplicate of the
circle. Keep duplicating the circle until you have the number of dots you need. (Don't worry about where the
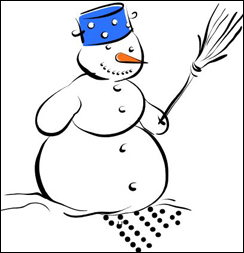
dots are. In the illustration below, for example, the dots are on the ground in front of the snowman.
- Next, move each dot onto the outline of the snowman. Remember, the dots should be on the perimeter of the
snowman, not on the waist or jaw line, and they should be evenly spaced. You might want to place one dot at
the tip of the left hand, and another on the tip of the right hand, and keep alternating side-to-side to ensure
even coverage. Be sure to put a dot in any crevice (between his head and shoulder or between his fingers and
hip, for example).
- Here's what the snowman might look like when finished. (The dots in the sample are red for illustration
purposes only.)
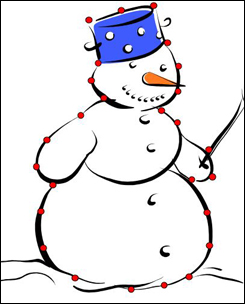
- Notice that some features -- buttons, eyes, nose, mouth, broom -- aren't part of the dotted drawing. If
you like, you can use the scribble tool or another drawing tool to add those features and others.
Hint: If you tend to worry about making a mistake as you learn, stop and save your work now, before
following the next step and deleting the snowman: Click File>Save As and save the file as "revised snowman"
or something similar. Now you have two files, including an original file containing the snowman image. That
is particularly helpful if you want to add or change details.
- Now, we'll delete the snowman image to see what we have left. Click the tip of the broom (or on another
spot on the snowman without dots). When the white boxes appear around the image, click Delete/Backspace. Voila!
A connect-the-dot snowman!

Note that in this version, the broom is gone and the mouth is one line instead of several circles. Those are
choices the author made as she added details with the scribble tool. You can choose to add more or less details
to your snowman too.
- Save your work!
Next: Grouping dots.
|
|