LABEL THE DOTS
Now, all that's left is to label the letters:
- Click the Text Box tool.

- Click near a dot (below, beside or above, depending on the dot's placement in the picture) and draw a small text box.
- Click and drag to adjust the size of the text box -- it should be just big enough to type a single letter in it.
- Click the next-to-last icon on the Drawing toolbar (or click Format > Text Box at the top of the window)
and choose "No line color" to change the line color of the text boxes from black to no line at all.
- Click the paint can (or Format > Text Box) and choose "No fill color" to ensure that white paint doesn't obscure the dots.
- Click the text box and then click CNTRL-D (or Apple-D). Repeat until you have 26 text boxes. Then drag a text box next to each dot.
- Type a different letter of the alphabet in each box. (Make sure the letters appear in a logical order or lines will cross and the image won't resemble a snowman!)
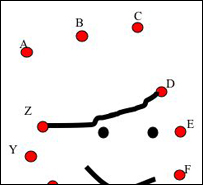
- This is what a final version might look like: (Red dots are for illustration.)
- Save your work.
You now can print the finished worksheet and have students complete it by hand (Add a title and a blank for the student's name prior to printing) or you can have students connect the dots on the computer. If students will be working on the computer,
- Repeat the steps for grouping described on a previous slide. Group all letters as well as the picture, so students can't move anything but the whole picture.
- Show students how to find and use the scribble tool. Let them practice their mouse skills as they use the scribble tool to connect the dots!
That's it -- easy, fun and practical! Who needs fancy software when all you need is Office to make great worksheets for your K-12 classroom?
Next: Learn more.
|