|
STEP FOUR: SAVE A SCREEN SHOT
By following steps 1-3, you can capture a screen shot and insert it into a program file. But what if you want just a copy of the screen shot itself? For example, you might want to
- e-mail the screen shot to your school's tech staff.
- publish the screen shot in a newsletter or on a Web site.
- send the screen shot to colleague who doesn't use Microsoft Office.
To save a screen shot as a separate image:
- Insert the screen shot into a Word document.
- Click the screen shot in the Word document, and then click Edit>Copy (or press CTRL and C keys)
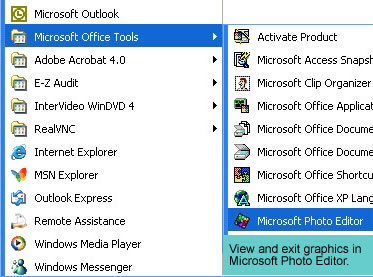
- Click Start>All Programs>Microsoft Office Tools (or Microsoft Office)>Microsoft Photo Editor to open Photo Editor. (Note: If you don't find Microsoft Office Tools or Photo Editor in your program files, you might need to install it from the Office CD. Sometimes schools don't install all features as part of a normal set-up.)
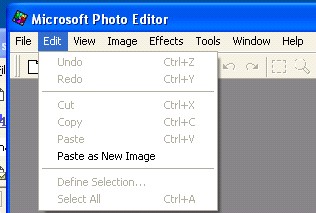
- Click Edit>Paste as New Image.
- Go to File>Save and name your image. Photo Editor will add .jpg to the end of the file name and save it as an image.
Congratulations! You now know how to create, use, and save screen shots!
Not all screen shots are of Web pages, of course. You can create a screen shot of anything you can show on your desktop. Just look through some of the screen shots in this techtorial for more ideas.
|