| A TECHTORIAL |
|
TRACKING CHANGES
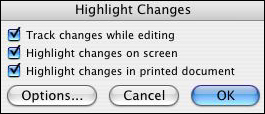
To get maximum benefit from peer or teacher editing, students need to be able to see, accept, or reject changes their editors have made. Microsoft Word's change tracker tool allows them to do just that. Provide students with the directions below for using the tool when editing or rewriting a Word document. For Word 98 and Word X for Mac users: Go to Tools>Track Changes>Highlight
Changes; check "Track changes while editing. With Word XP: Go to Tools>Track Changes to open the Reviewing toolbar.
The toolbar includes four yellow icons, each with a different symbol
(a forward arrow, a back arrow, a check mark, and a red X); a New
Comment icon; a Track Changes icon; and a Reviewing Pane icon. Track Changes can be used for in-depth editing of student work, as well as for a number of professional tasks. Track Changes is especially helpful for working on committee or collaborative documents. Next: No comment?
|